
Authentication in mobile apps
Most of the apps we use every day require a user account. There are many reasons for this. As an app developer, you are faced with the choice of how to implement such an account mechanism and an associated authentication procedure for your own app. In my perception, many app developers rely on procedures that allow users to log in to a new app with an existing account. These procedures (“Sign in with GitHub” or “Sign in with Google”) are based on OAuth 2.0 and the Authorization Code Flow.
A mobile app is not trustworthy
For authentication procedures and other security-relevant aspects, a mobile app cannot be classified as trustworthy. For example, an app can be decompiled and modified. Therefore, no secrets and passwords should be included in the source code of an app and all data sent from an app to a backend must be carefully validated in the backend. The fact that passwords and secrets should not be stored in a mobile app poses a certain challenge for authentication procedures.
The OAuth 2.0 Authorization Code Flow, which is popular with app developers, also requires a client secret in its original form in order to receive an access token at a certain point in the flow. This client secret should not be included in the app for the reasons described above. App developers therefore have a choice: they can outsource the client secret to a trusted backend and adapt or redirect the Authorization Code Flow accordingly, or they can omit the client secret entirely. With the extension Proof Key for Code Exchange (PKCE), the Authorization Code Flow offers the option of omitting a client secret.
Authorization Code Flow (with Proof Key for Code Exchange)
The Authorization Code Flow with PKCE can omit a client secret because a unique code is negotiated between the client and the authorization server. Based on this code, which is renewed each time an access token is issued, the authorization server can recognize that the client who wants to receive an access token is the same client for which a user has previously authenticated themselves via the Authorization Code Flow. The authorization server used in this article is Keycloak. The following sequence diagram shows the flow:
- A user opens the mobile app and triggers a login, e.g. by tapping a button.
- The app generates a code verifier and a code challenge. Together with the code challenge, the app sends a request to Keyloak to obtain an authorization code. In this example, Keyloak runs under
http://localhost:11111.
http://localhost:11111/realms/test/protocol/openid-connect/auth?code_challenge=<CODE_CHALLENGE>&code_challenge_method=S256&redirect_uri=exp://192.168.178.95:8081&client_id=rn-expo-app&response_type=code&state=<STATE>&scope=openid+profile
- Keycloak remembers the code challenge and redirects the request to its own login page. The login page is displayed in the app. This is where the user logs in.
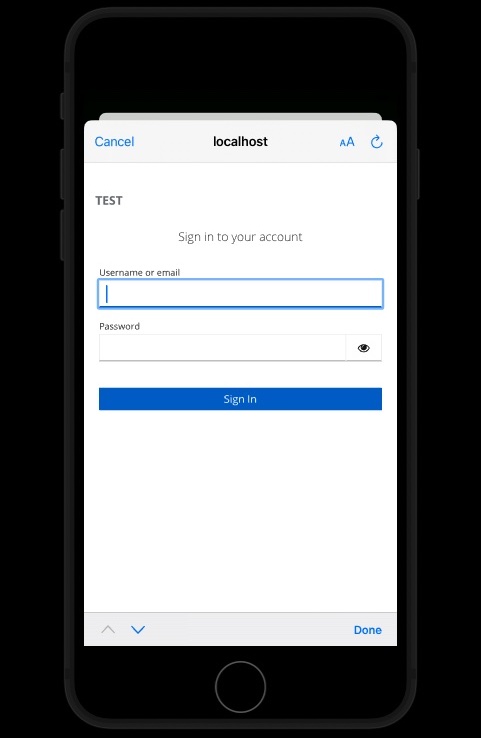
- The login page is sent to Keycloak with the login information. Keycloak authenticates the user.
- Keycloak sends an authorization code to the app.
GET exp://192.168.178.95:8081?state=<STATE>&session_state=<SESSION_STATE>&iss=http://localhost:11111/realms/test&code=<AUTHORIZATION_CODE>
- The app requests an access token for this authorization code. The request also contains the previously generated code verifier.
POST http://localhost:11111/realms/test/protocol/openid-connect/token
  grant_type=authorization_code
  client_id=rn-expo-app
  code=<AUTHORIZATION_CODE>
  code_verifier=<CODE_VERIFIER>
  redirect_uri=exp://192.168.178.95:8081
- Keycloak compares the code verifier received with the stored code challenge (Details). If there is a match, Keycloak sends the requested access token to the app in the form of a JSON Web Token (JWT). The payload of the JWT contains the following data, among others:
{
  ...
  "exp": 1705659894,
  "iat": 1705659594,
  "auth_time": 1705659567,
  "iss": "http://localhost:11111/realms/test",
  "aud": "account",
  "sub": "cd026591-5cb2-4089-970b-f317153ae6c8",
  "typ": "Bearer",
  "azp": "rn-expo-app",
  "scope": "openid profile email"
  ...
}
- The app calls the user info endpoint of Keycloak. The received access token is included in the HTTP header
Authorization: Bearer <ACCESS_TOKEN>.
GET http://localhost:11111/realms/test/protocol/openid-connect/userinfo
- Keycloak sends the user information back to the app. This user information can look like the following example:
{
  "sub":"cd026591-5cb2-4089-970b-f317153ae6c8",
  "email_verified": true,
  "name": "John Doe",
  "preferred_username": "jd",
  "given_name": "John",
  "family_name": "Doe",
  "email": "john.doe@example.com"
}
In the rest of the article, an example will be created that implements the outlined Authorization Code Flow with PKCE in practice. To create the mobile app, React Native is used in conjunction with Expo. Keycloak is used as the authorization server.
Setting up Keycloak
Starting as a container
For this example, Keycloak is executed locally in a container. This requires an appropriate runtime environment for containers. For example, Docker Desktop or Podman Desktop can be used here.
After the runtime environment has been installed and started, a new container with a running Keycloak instance can be started as follows:
podman run --name keycloak --detach --publish 11111:8080 --env KEYCLOAK_ADMIN=admin --env KEYCLOAK_ADMIN_PASSWORD=admin quay.io/keycloak/keycloak:latest start-dev
The username and password are passed as environment variables. The Keycloak instance can then be accessed via http://localhost:11111/admin.
The following commands can be used to stop and delete the container if required:
podman stop keycloak && podman rm keycloak
Creating a realm
The required configurations, which will be made in Keycloak later on, are made in a realm. It is advisable to create a new realm with the name test. To do this, you must log in to the Keycloak web interface as user admin at http://localhost:11111/admin.
The exact procedure for creating a realm is described in the Keycloak documentation. After the realm has been created, Keycloak automatically switches to the new test realm.
Create a client
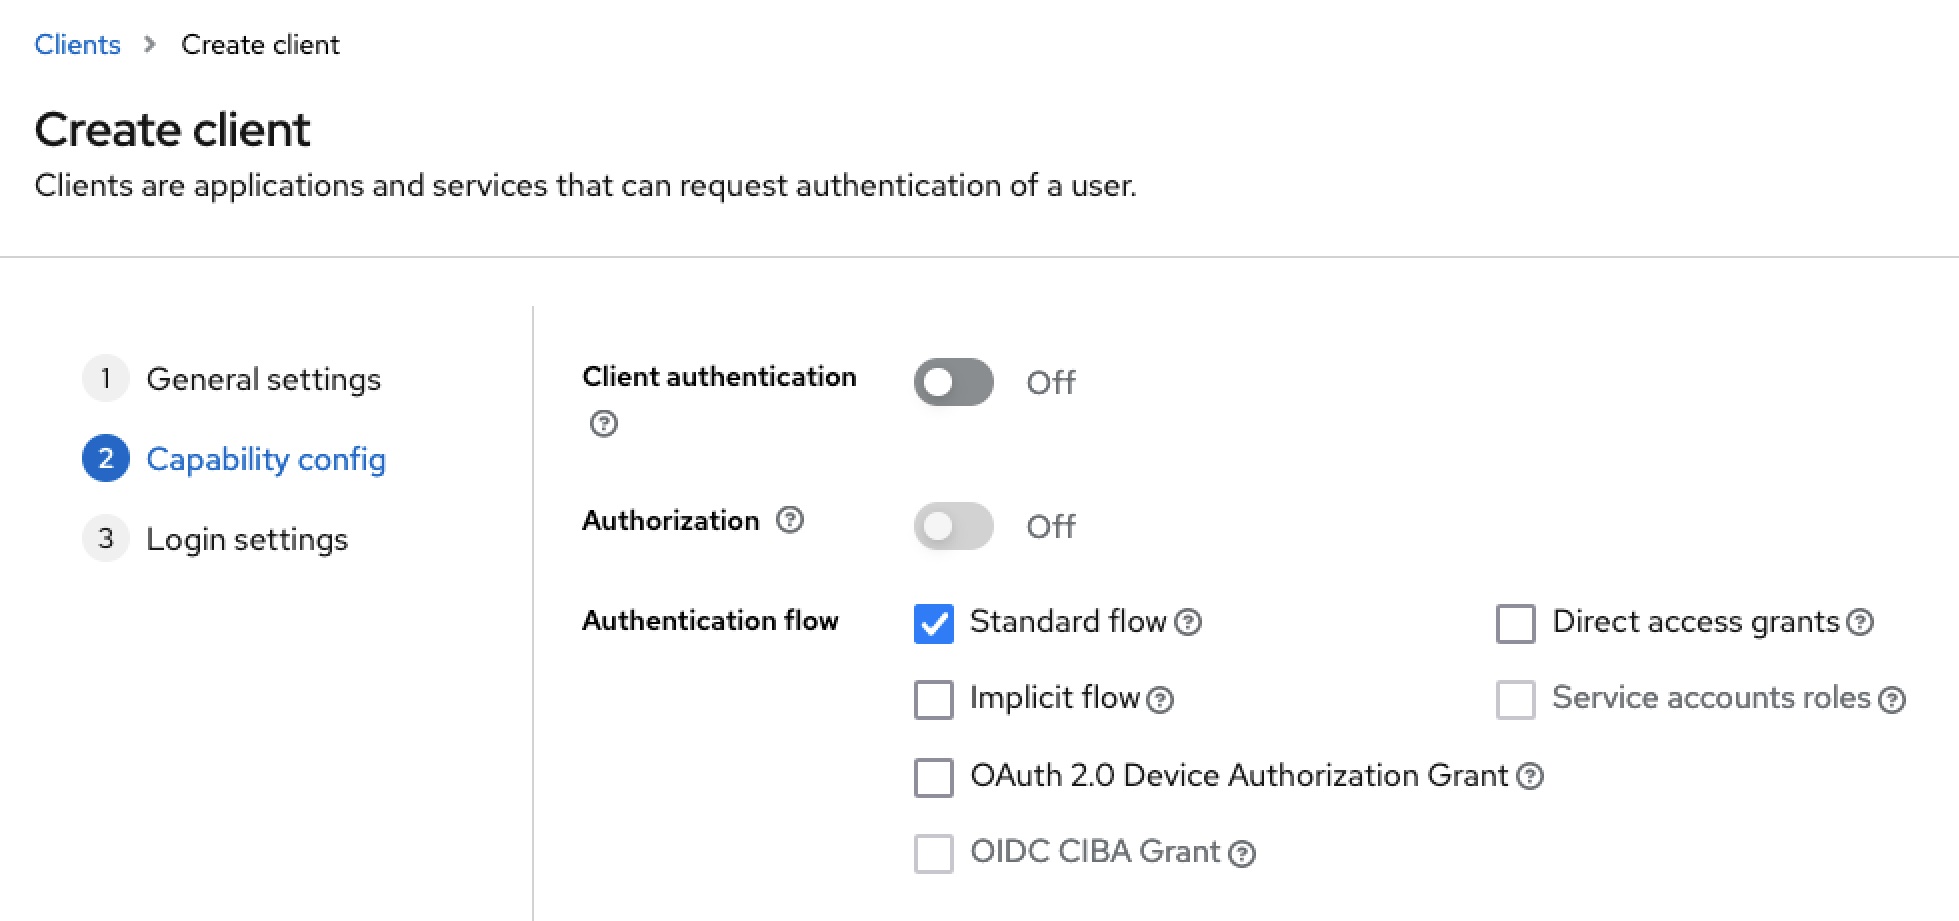
Then a new client must be created in the test realm. The name rn-expo-app should be used as the client ID. The Standard flow must be selected as the Authentication flow, as this corresponds to the Authorization Code Flow shown above.
Last but not least, the value exp://192.168.178.95:8081 must be entered for Valid redirect URI. The exp:// protocol used originates from Expo. The context will be described later on.
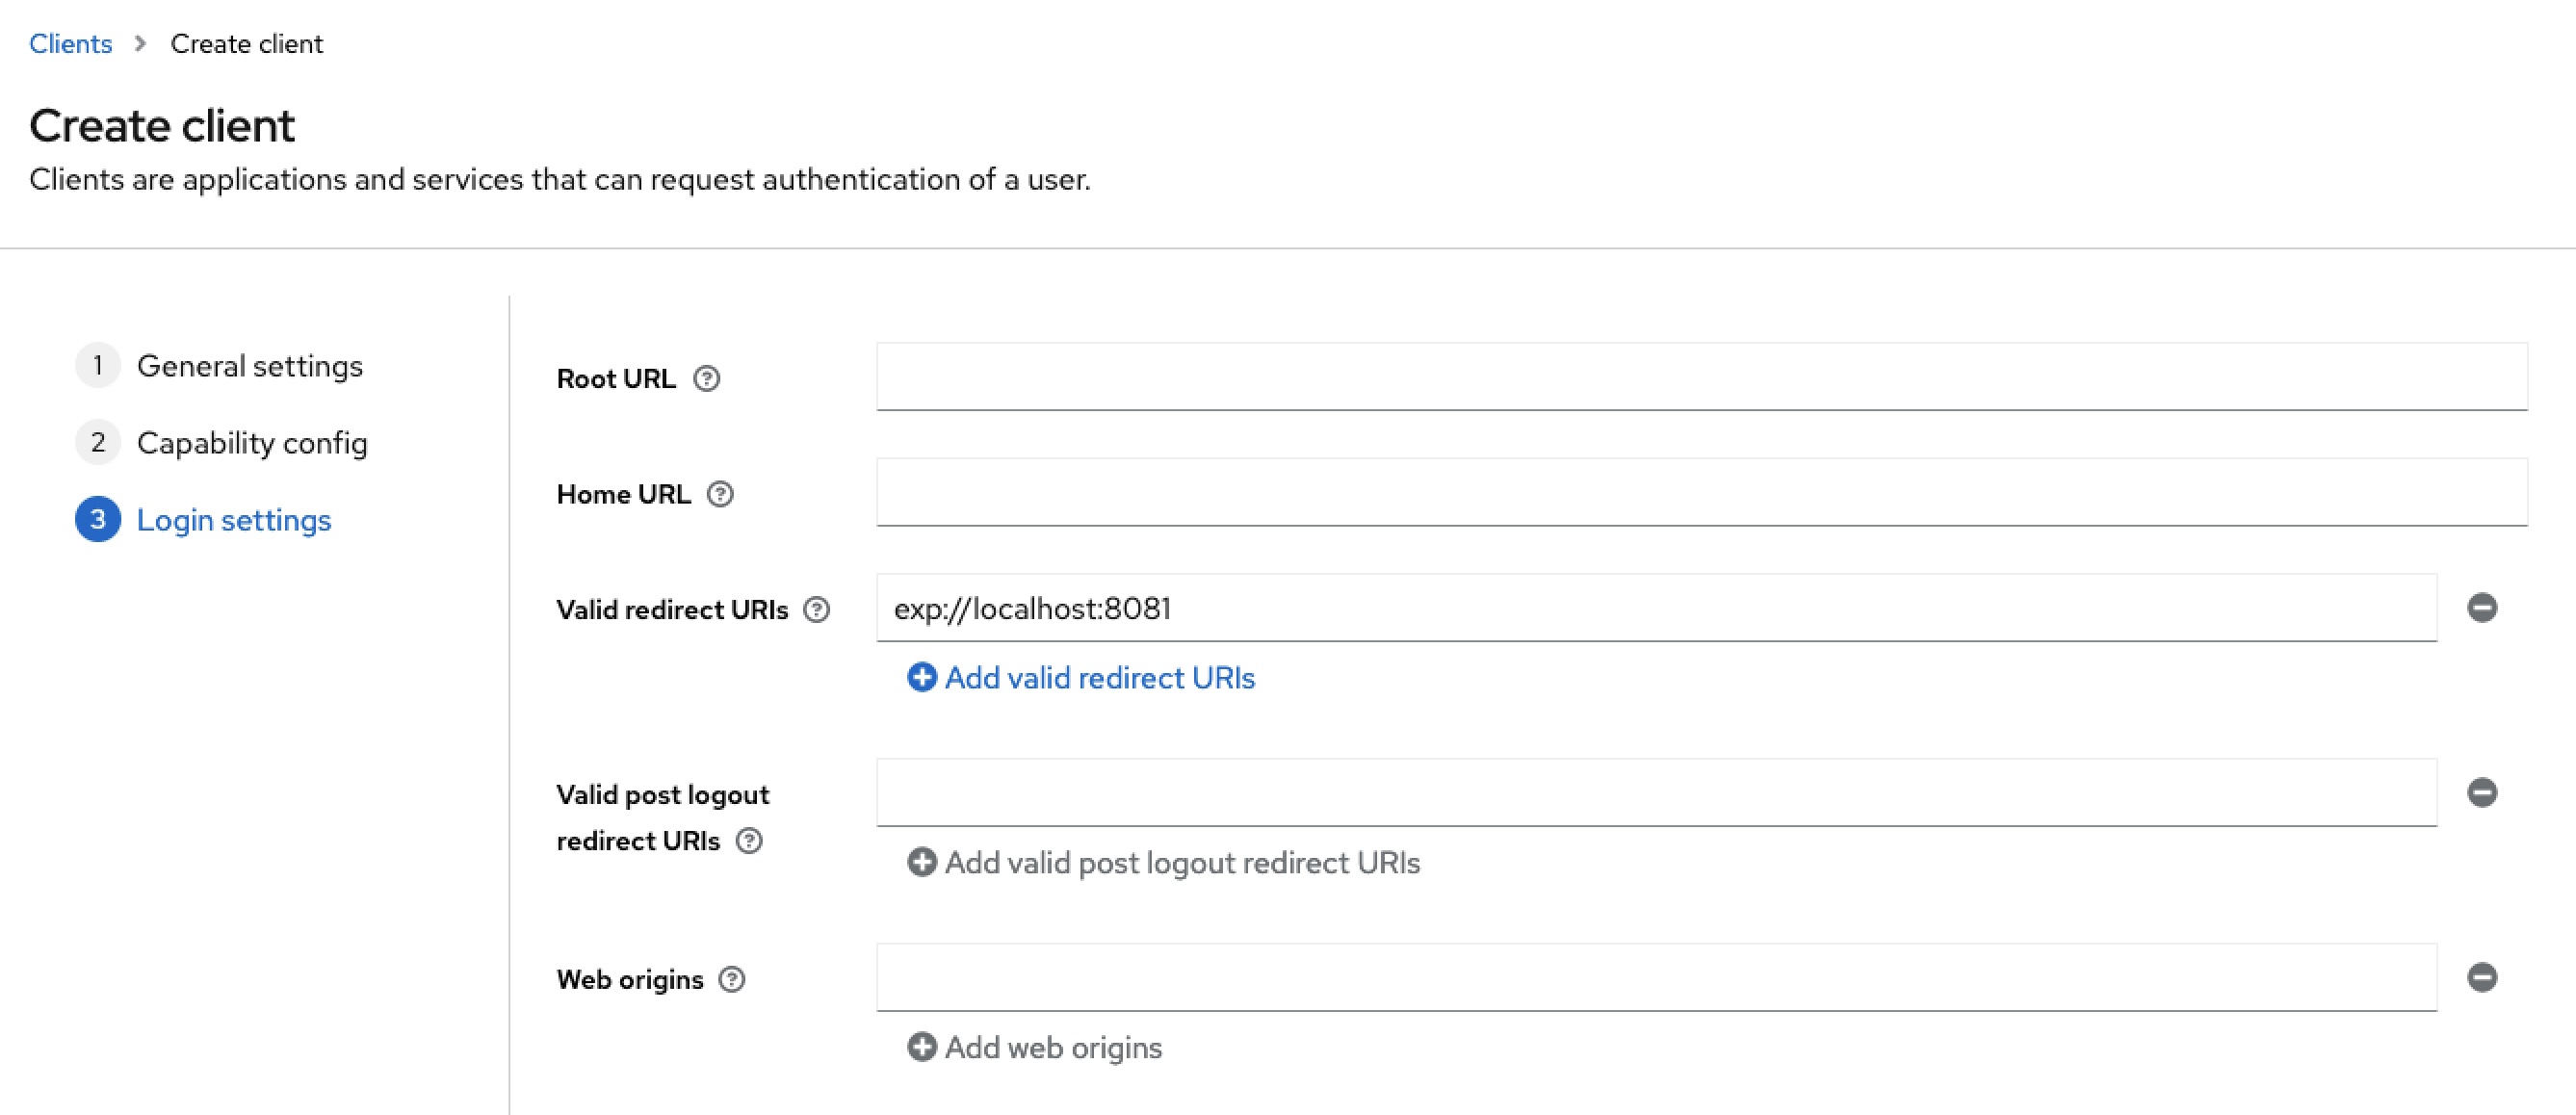
For further details on creating and configuring clients, please refer to the official Keycloak documentation.
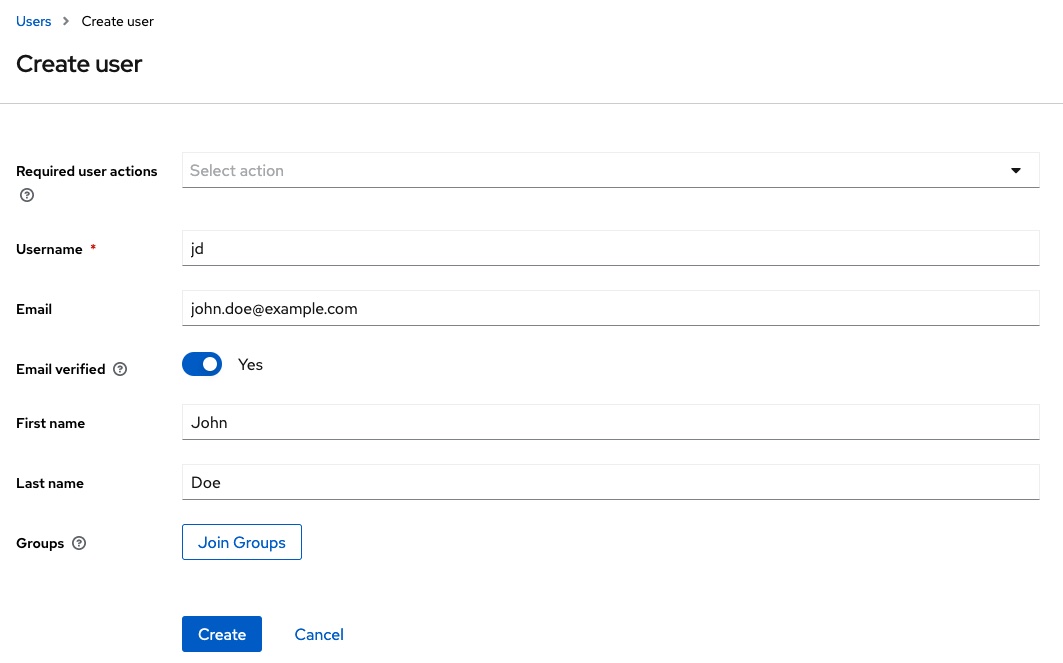
Create a user
In practice, Keycloak is usually linked to an identity provider. To avoid increasing the complexity of the example too much, this is not used here. Instead, a user is created directly in Keycloak in the test realm.
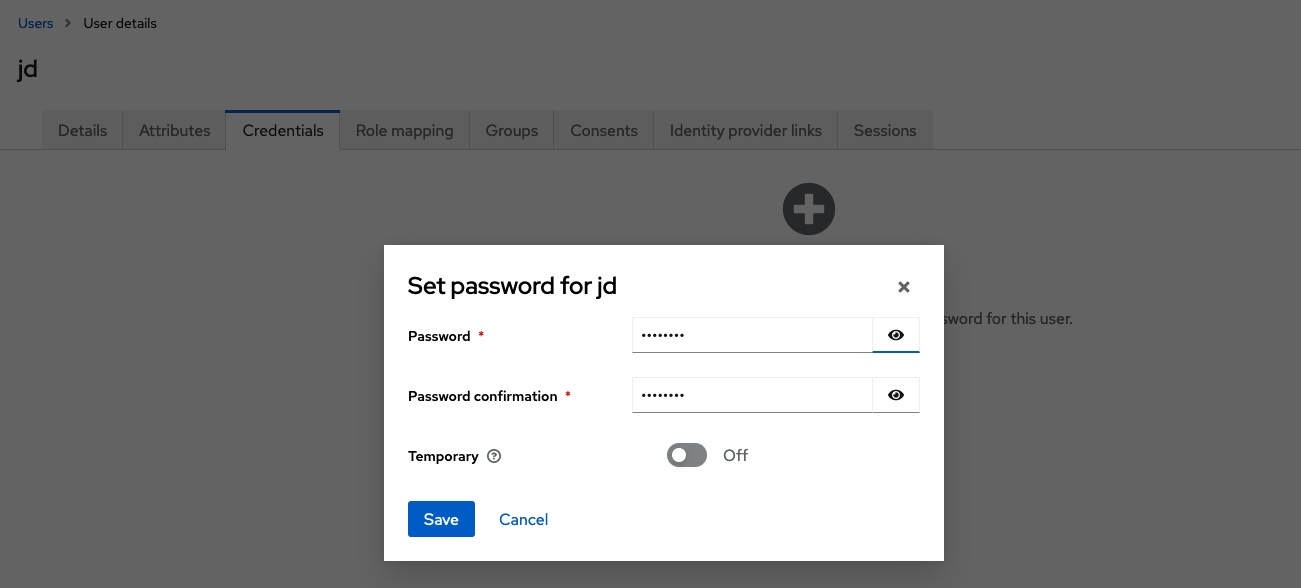
After the user has been created, credentials are assigned to it. In this example, the value password is used as the password. To save further manual steps, the password is marked as non-temporary.
Further information on creating and managing users can be found in the Keycloak documentation.
Export a realm
The realm created and the contained client and user can be exported to a JSON file. This way they can be reused later, if required. To do this, execute the following command in the terminal:
podman exec -it keycloak /opt/keycloak/bin/kc.sh export --file /tmp/realm-export.json --realm test --users realm_file
podman cp keycloak:/tmp/realm-export.json /path/to/folder/with/realm-export
The JSON file realm-export.json is then located in the directory /path/to/folder/with/realm-export. If you restart the Keycloak container at a later time, you can include the file via a volume and import it when you start Keycloak:
podman run --name keycloak --detach --publish 11111:8080 --env KEYCLOAK_ADMIN=admin --env KEYCLOAK_ADMIN_PASSWORD=admin --volume /path/to/folder/with/realm-export:/opt/keycloak/data/import quay.io/keycloak/keycloak:latest start-dev --import-realm
Expo project rn-expo-oauth-authorization-code-flow-pkce-keycloak
Now that the Keycloak instance is available with the required configuration, the next step is to create the React Native app. To do this, a new Expo project is created via the Expo-CLI:
npx create-expo-app rn-expo-oauth-authorization-code-flow-pkce-keycloak
The project created will be gradually expanded to include the required functions.
Navigation and screens
The example app consists of a simple navigation and a handful of screens. The app has the following screen structure:
Screens
└── SignIn
└── Home
    └── Profile
    └── Manager
    └── IC
SignInScreen and HomeScreen are on the same level, but are not visible at the same time. Authentication takes place in the SignInScreen. Authenticated users access the HomeScreen and have access to the underlying screens, such as ProfileScreen.
The respective screens are simple React components. The HomeScreen, for example, is implemented as follows:
import React from 'react'
import { Button, StyleSheet, Text, View } from 'react-native'

const HomeScreen = ({ navigation }) => {
  return (
    <View style={styles.container}>
      <Text>Home-Screen</Text>
      <Button onPress={() => navigation.navigate('Profile')} title={'Profile'} />
    </View>
  )
}

const styles = StyleSheet.create({
  container: {
    flex: 1,
    backgroundColor: '#fff',
    alignItems: 'center',
    justifyContent: 'center',
  },
})

export { HomeScreen }
The technical foundation for the navigation is React Navigation. The required dependencies are added to the project as follows:
npx expo install @react-navigation/native react-native-screens react-native-safe-area-context @react-navigation/native-stack
The screens mentioned are organized in a simple Native-Stack-Navigator. The native stack navigator is embedded in a NavigationContainer in the App.js:
import React from 'react'
import { NavigationContainer } from '@react-navigation/native'
import { createNativeStackNavigator } from '@react-navigation/native-stack'
import { HomeScreen } from './screens/HomeScreen'
import { ProfileScreen } from './screens/ProfileScreen'
import { SignInScreen } from './screens/SignInScreen'

const NativeStack = createNativeStackNavigator()

export default function App() {
  return (
    <NavigationContainer>
      <NativeStack.Navigator>
        <NativeStack.Screen name={'Home'} component={HomeScreen} />
        <NativeStack.Screen name={'Profile'} component={ProfileScreen} />
        <NativeStack.Screen name={'SignIn'} component={SignInScreen} />
      </NativeStack.Navigator>
    </NavigationContainer>
  )
}
In its own documentation, React Navigation describes a simple approach for rendering different screens within a stack depending on the authentication. This so-called Protected Routes Pattern is also used in the example app. The authentication state is initially represented by a local state. The adapted App.js now looks as follows:
import React, { useState } from 'react'
import { NavigationContainer } from '@react-navigation/native'
import { createNativeStackNavigator } from '@react-navigation/native-stack'
import { HomeScreen } from './screens/HomeScreen'
import { ProfileScreen } from './screens/ProfileScreen'
import { SignInScreen } from './screens/SignInScreen'

const NativeStack = createNativeStackNavigator()

export default function App() {
  const [isSignedIn, setIsSignedIn] = useState(false)

  return (
    <NavigationContainer>
      <NativeStack.Navigator>
        {isSignedIn ? (
          <>
            <NativeStack.Screen name={'Home'} component={HomeScreen} />
            <NativeStack.Screen name={'Profile'} component={ProfileScreen} />
          </>
        ) : (
          <NativeStack.Screen name={'SignIn'} component={SignInScreen} />
        )}
      </NativeStack.Navigator>
    </NavigationContainer>
  )
}
Depending on the value of isSignedIn, only HomeScreen and ProfileScreen or SignInScreen are available in the native stack.
AuthContext
A cross-component management of a central state is required for the extension of the example. A combination of React Context and React Reducer is used for this, as described here. Context and Reducer are implemented in the file context/AuthContext.js.
import React, { createContext, useMemo, useReducer } from 'react'

const initialState = {
  isSignedIn: false,
  accessToken: null,
  idToken: null,
  userInfo: null,
}

const AuthContext = createContext({
  state: initialState,
  signIn: () => {},
  signOut: () => {},
})

const AuthProvider = ({ children }) => {
  const [authState, dispatch] = useReducer((previousState, action) => {
    switch (action.type) {
      case 'SIGN_IN':
        return {
          ...previousState,
          isSignedIn: true,
          accessToken: 'TODO',
          idToken: 'TODO',
        }
      case 'USER_INFO':
        return {
          ...previousState,
          userInfo: { /* TODO */ },
        }
      case 'SIGN_OUT':
        return {
          initialState,
        }
    }
  }, initialState)

  const authContext = useMemo(
    () => ({
      state: authState,
      signIn: () => { /* TODO */ },
      signOut: () => { /* TODO */ },
    }),
    [authState]
  )

  return (
    <AuthContext.Provider value={authContext}>{children}</AuthContext.Provider>
  )
}

export { AuthContext, AuthProvider }
The context consists of a state, which contains all relevant information for authentication, and the signIn and signOut functions. The reducer processes three action types:
SIGN_IN: The login has taken place and an access token is available.SIGN_OUT: Logout has taken place and the sample app is back in its initial state.USER_INFO: The logged-in user’s information has been retrieved.
The context provider AuthProvider gets integrated in the App.js:
import React from 'react'
import { Main } from './components/Main'
import { AuthProvider } from './context/AuthContext'

export default function App() {
  return (
    <AuthProvider>
      <Main />
    </AuthProvider>
  )
}
The existing code from App.js is transferred to a separate component Main in the file components/Main.js:
import React, { useContext } from 'react'
import { NavigationContainer } from '@react-navigation/native'
import { createNativeStackNavigator } from '@react-navigation/native-stack'
import { AuthContext } from '../context/AuthContext'
import { HomeScreen } from './screens/HomeScreen'
import { AboutScreen } from './screens/AboutScreen'
import { SignInScreen } from './screens/SignInScreen'

const NativeStack = createNativeStackNavigator()

const Main = () => {
  const { state } = useContext(AuthContext)

  return (
    <NavigationContainer>
      <NativeStack.Navigator>
        {state.isSignedIn ? (
          <>
            <NativeStack.Screen name={'Home'} component={HomeScreen} />
            <NativeStack.Screen name={'About'} component={AboutScreen} />
          </>
        ) : (
          <NativeStack.Screen
            name={'SignIn'}
            component={SignInScreen}
            options={{ animationTypeForReplace: 'pop' }}
          />
        )}
      </NativeStack.Navigator>
    </NavigationContainer>
  )
}

export { Main }
The previously created context can be accessed in the component using the useContext hook. The state contained in the context can now be used instead of the previously used local state to decide which screens are rendered within the native stack.
The signIn and signOut functions can be integrated into the SignInScreen and HomeScreen respectively. This is also done via the provided context:
import React, { useContext } from 'react'
import { Button, StyleSheet, Text, View } from 'react-native'
import { AuthContext } from '../context/AuthContext'

const SignInScreen = () => {
  const { signIn } = useContext(AuthContext)

  return (
    <View style={styles.container}>
      <Text>SignIn-Screen</Text>
      <Button onPress={signIn} title={'Sign in'} />
    </View>
  )
}

const styles = StyleSheet.create({
  container: {
    flex: 1,
    backgroundColor: '#fff',
    alignItems: 'center',
    justifyContent: 'center',
  },
})

export { SignInScreen }
Expo AuthSession
The implementation of the Authorization Code Flow with PKCE in conjunction with Keycloak can be implemented in a React Native app partly with the help of the Expo AuthSession module. The module supports PKCE, as long as the authorization server used also supports it. This is the case with Keycloak, but not with GitHub, for example. First, the required dependencies for the module are added to the project:
npx expo install expo-auth-session expo-crypto
The module provides the necessary auxiliary functions to obtain an authorization code from Keycloak. In relation to the sequence diagram shown above, it covers the steps 2 to 5. For this purpose, context/AuthContext.js is extended accordingly.
...
import { makeRedirectUri, useAuthRequest, useAutoDiscovery } from 'expo-auth-session'
...
const AuthProvider = ({ children }) => {
  const discovery = useAutoDiscovery(process.env.EXPO_PUBLIC_KEYCLOAK_URL)
  const redirectUri = makeRedirectUri()
  const [request, response, promptAsync] = useAuthRequest(
    {
      clientId: process.env.EXPO_PUBLIC_KEYCLOAK_CLIENT_ID,
      redirectUri: redirectUri,
      scopes: ['openid', 'profile'],
    },
    discovery
  )
  ...
  const authContext = useMemo(
    () => ({
      state: authState,
      signIn: () => {
        promptAsync()
      },
      signOut: () => { /* TODO */ },
    }),
    [authState]
  )
}
...
The EXPO_PUBLIC_KEYCLOAK_URL and EXPO_PUBLIC_KEYCLOAK_CLIENT_ID environment variables used can be stored in a .env file, for example:
EXPO_PUBLIC_KEYCLOAK_URL=http://localhost:11111/realms/test
EXPO_PUBLIC_KEYCLOAK_CLIENT_ID=rn-expo-app
The auxiliary function useAutoDiscovery determines the required URLs from the Authorization Server to initiate the Authorization Code Flow. The makeRedirectUri function generates a redirect URI that enables redirection from Keycloak back to the native app. When the app is executed via Expo Go, a URI such as exp://192.168.178.95:8081 is created here, for example. The scheme exp:// belongs to Expo Go. The IP address corresponds to the address of the device on which Expo Go is executed. When executed via a Development Build, a scheme is generated as defined in the app.json in expo.scheme. The function promptAsync initiates the actual authentication process, as described above in step 3.
Following successful authentication, the module provides an authorization code that can be used to retrieve an access token from Keycloak. This is done in a useEffect hook, also in context/AuthContext.js:
...
  useEffect(() => {
    const getToken = async ({ code, codeVerifier, redirectUri }) => {
      try {
        const formData = {
          grant_type: 'authorization_code',
          client_id: process.env.EXPO_PUBLIC_KEYCLOAK_CLIENT_ID,
          code: code,
          code_verifier: codeVerifier,
          redirect_uri: redirectUri,
        }
        const formBody = []
        for (const property in formData) {
          var encodedKey = encodeURIComponent(property)
          var encodedValue = encodeURIComponent(formData[property])
          formBody.push(encodedKey + '=' + encodedValue)
        }

        const response = await fetch(
          `${process.env.EXPO_PUBLIC_KEYCLOAK_URL}/protocol/openid-connect/token`,
          {
            method: 'POST',
            headers: {
              Accept: 'application/json',
              'Content-Type': 'application/x-www-form-urlencoded',
            },
            body: formBody.join('&'),
          }
        )
        if (response.ok) {
          const payload = await response.json()
          dispatch({ type: 'SIGN_IN', payload })
        }
      } catch (e) {
        console.warn(e)
      }
    }
    if (response?.type === 'success') {
      const { code } = response.params
      getToken({
        code,
        codeVerifier: request?.codeVerifier,
        redirectUri,
      })
    } else if (response?.type === 'error') {
      console.warn('Authentication error: ', response.error)
    }
  }, [dispatch, redirectUri, request?.codeVerifier, response])
...
If the module has received an authorization code, this is available in response.params.code. Together with the other required parameters grant_type, client_id, code_verifier and redirect_uri, the request is sent to Keycloak. The code_verifier parameter used here was previously generated by the expo-auth-session module and is part of the PKCE described above. The response from Keycloak contains the access token. This is dispatched in an action object and processed by the corresponding reducer:
...
      case 'SIGN_IN':
        return {
          ...previousState,
          isSignedIn: true,
          accessToken: action.payload.access_token,
          idToken: action.payload.id_token,
        }
...
With the help of the access token, the information about the authenticated user can now be retrieved from the user info endpoint of Keycloak. The Access-Token is provided in the request to Keycloak in the HTTP header Authorization as bearer token.
...
  useEffect(() => {
    const getUserInfo = async () => {
      try {
        const accessToken = authState.accessToken
        const response = await fetch(
          `${process.env.EXPO_PUBLIC_KEYCLOAK_URL}/protocol/openid-connect/userinfo`,
          {
            method: 'GET',
            headers: {
              Authorization: 'Bearer ' + accessToken,
              Accept: 'application/json',
            },
          }
        )
        if (response.ok) {
          const payload = await response.json()
          dispatch({ type: 'USER_INFO', payload })
        }
      } catch (e) {
        console.warn(e)
      }
    }
    if (authState.isSignedIn) {
      getUserInfo()
    }
  }, [authState.accessToken, authState.isSignedIn, dispatch])
...
The response from Keycloak contains the user information. This is dispatched in an action object and processed by the corresponding reducer:
...
      case 'USER_INFO':
        return {
          ...previousState,
          userInfo: {
            username: action.payload.preferred_username,
            givenName: action.payload.given_name,
            familyName: action.payload.family_name,
            email: action.payload.email,
          },
        }
...
Finally, the signOut function is implemented. An ID token issued by Keycloak together with the access token is used for this. This token is contained in the request that terminates the active session of the authenticated user in Keycloak. The action SIGN_OUT is then dispatched to return the app to its initial state.
...
  const authContext = useMemo(
    () => ({
      state: authState,
      signIn: () => {
        promptAsync()
      },
      signOut: async () => {
        try {
          const idToken = authState.idToken
          await fetch(
            `${process.env.EXPO_PUBLIC_KEYCLOAK_URL}/protocol/openid-connect/logout?id_token_hint=${idToken}`
          )
          dispatch({ type: 'SIGN_OUT' })
        } catch (e) {
          console.warn(e)
        }
      },
    }),
    [authState]
  )
...
The sample app now contains all the functions required to complete the sequence shown in the sequence diagram above from steps 1 to 9.
Role-based authorization
The authentication shown in the example can be extended flexibly. Roles can be defined in Keycloak, which can then also be made available in the information about the logged-in user. This role information can then be taken into account in the app, for example to make certain screens only available to certain roles.
Keycloak extension
Another user (Jane Roe) with a password is created in Keycloak first.
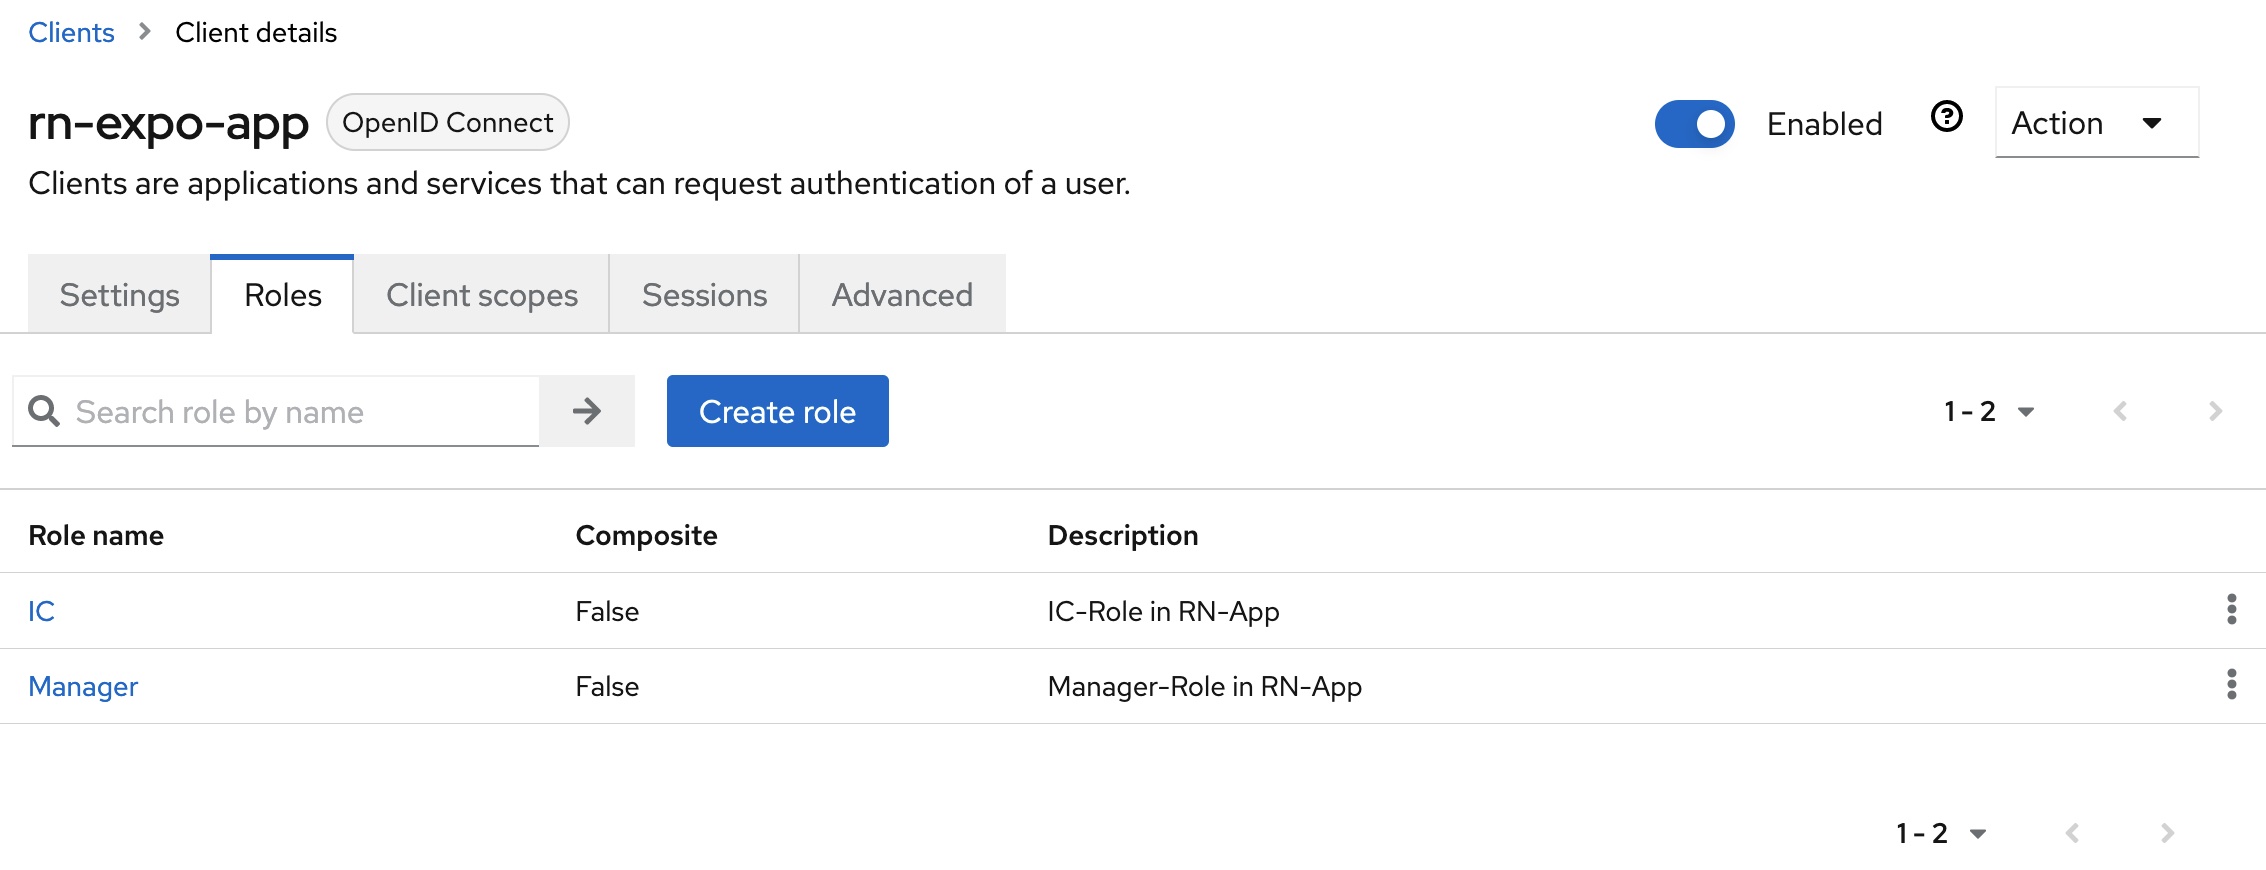
The configuration of the existing client rn-expo-app is then extended. The two roles Manager and IC are created in the Roles tab.
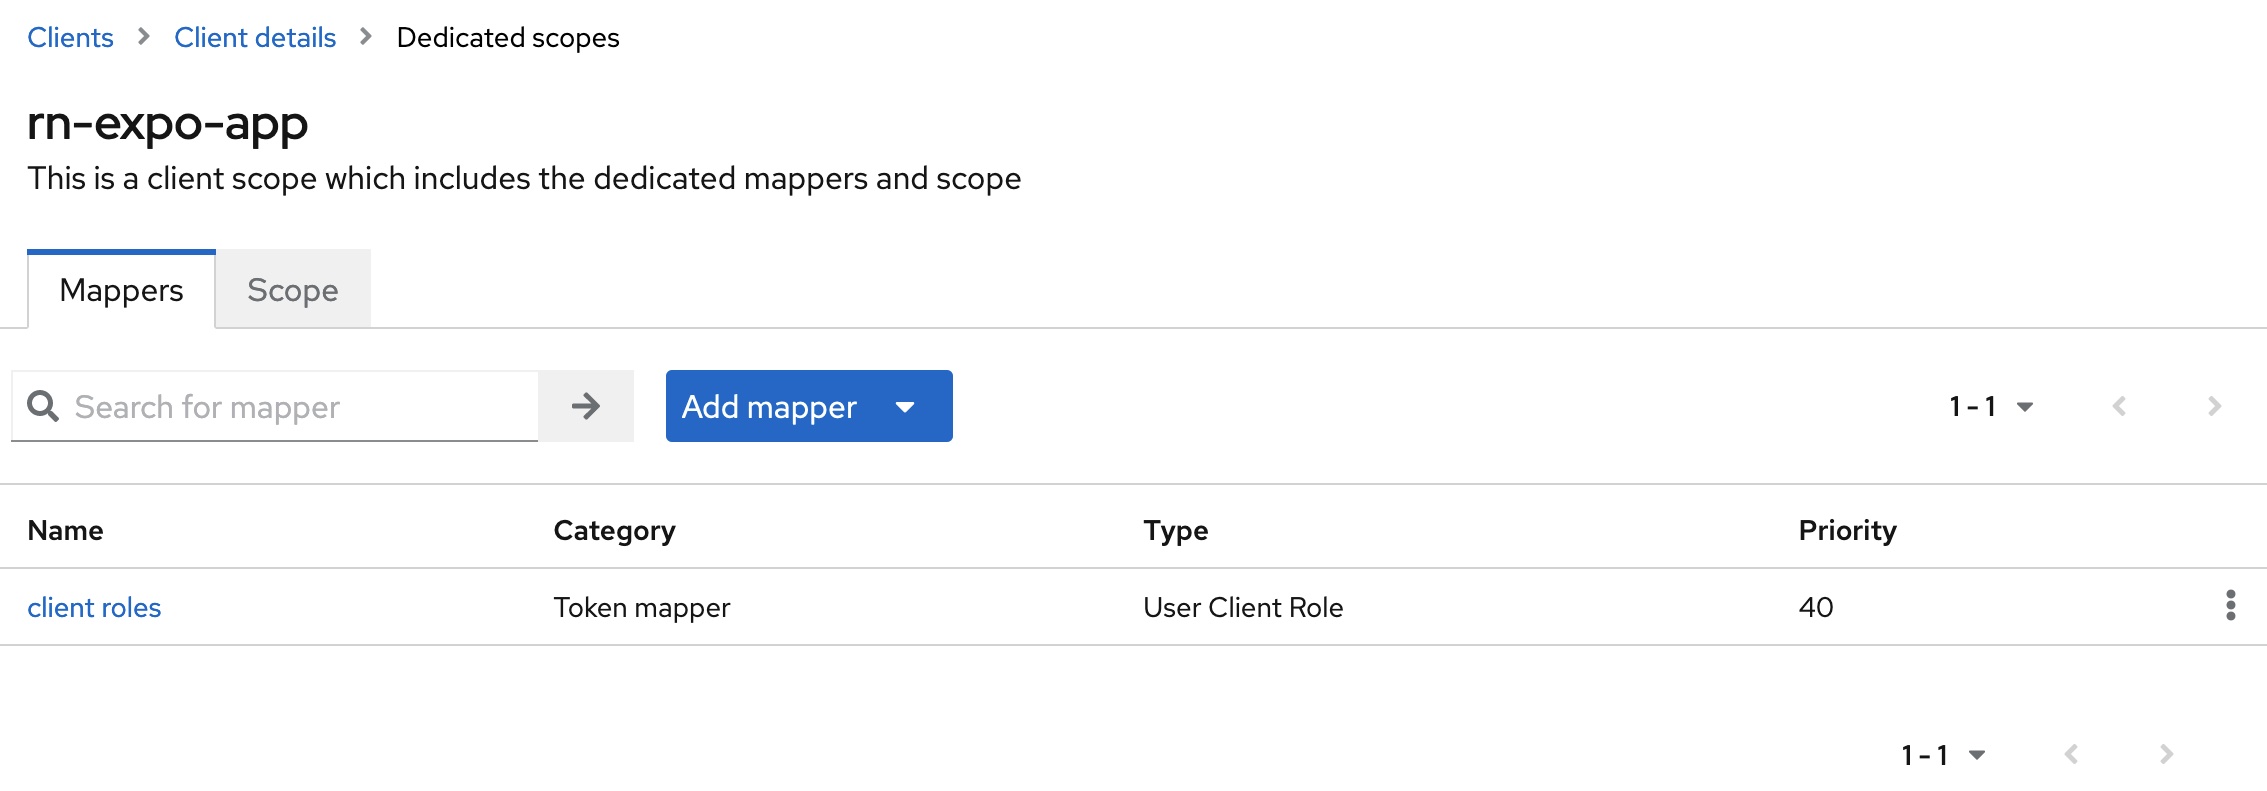
The client scope with the name rn-expo-app-dedicated must then be edited in the Client scopes tab. The mapper with the name client roles and the type User Client Role is added to the Mappers tab.
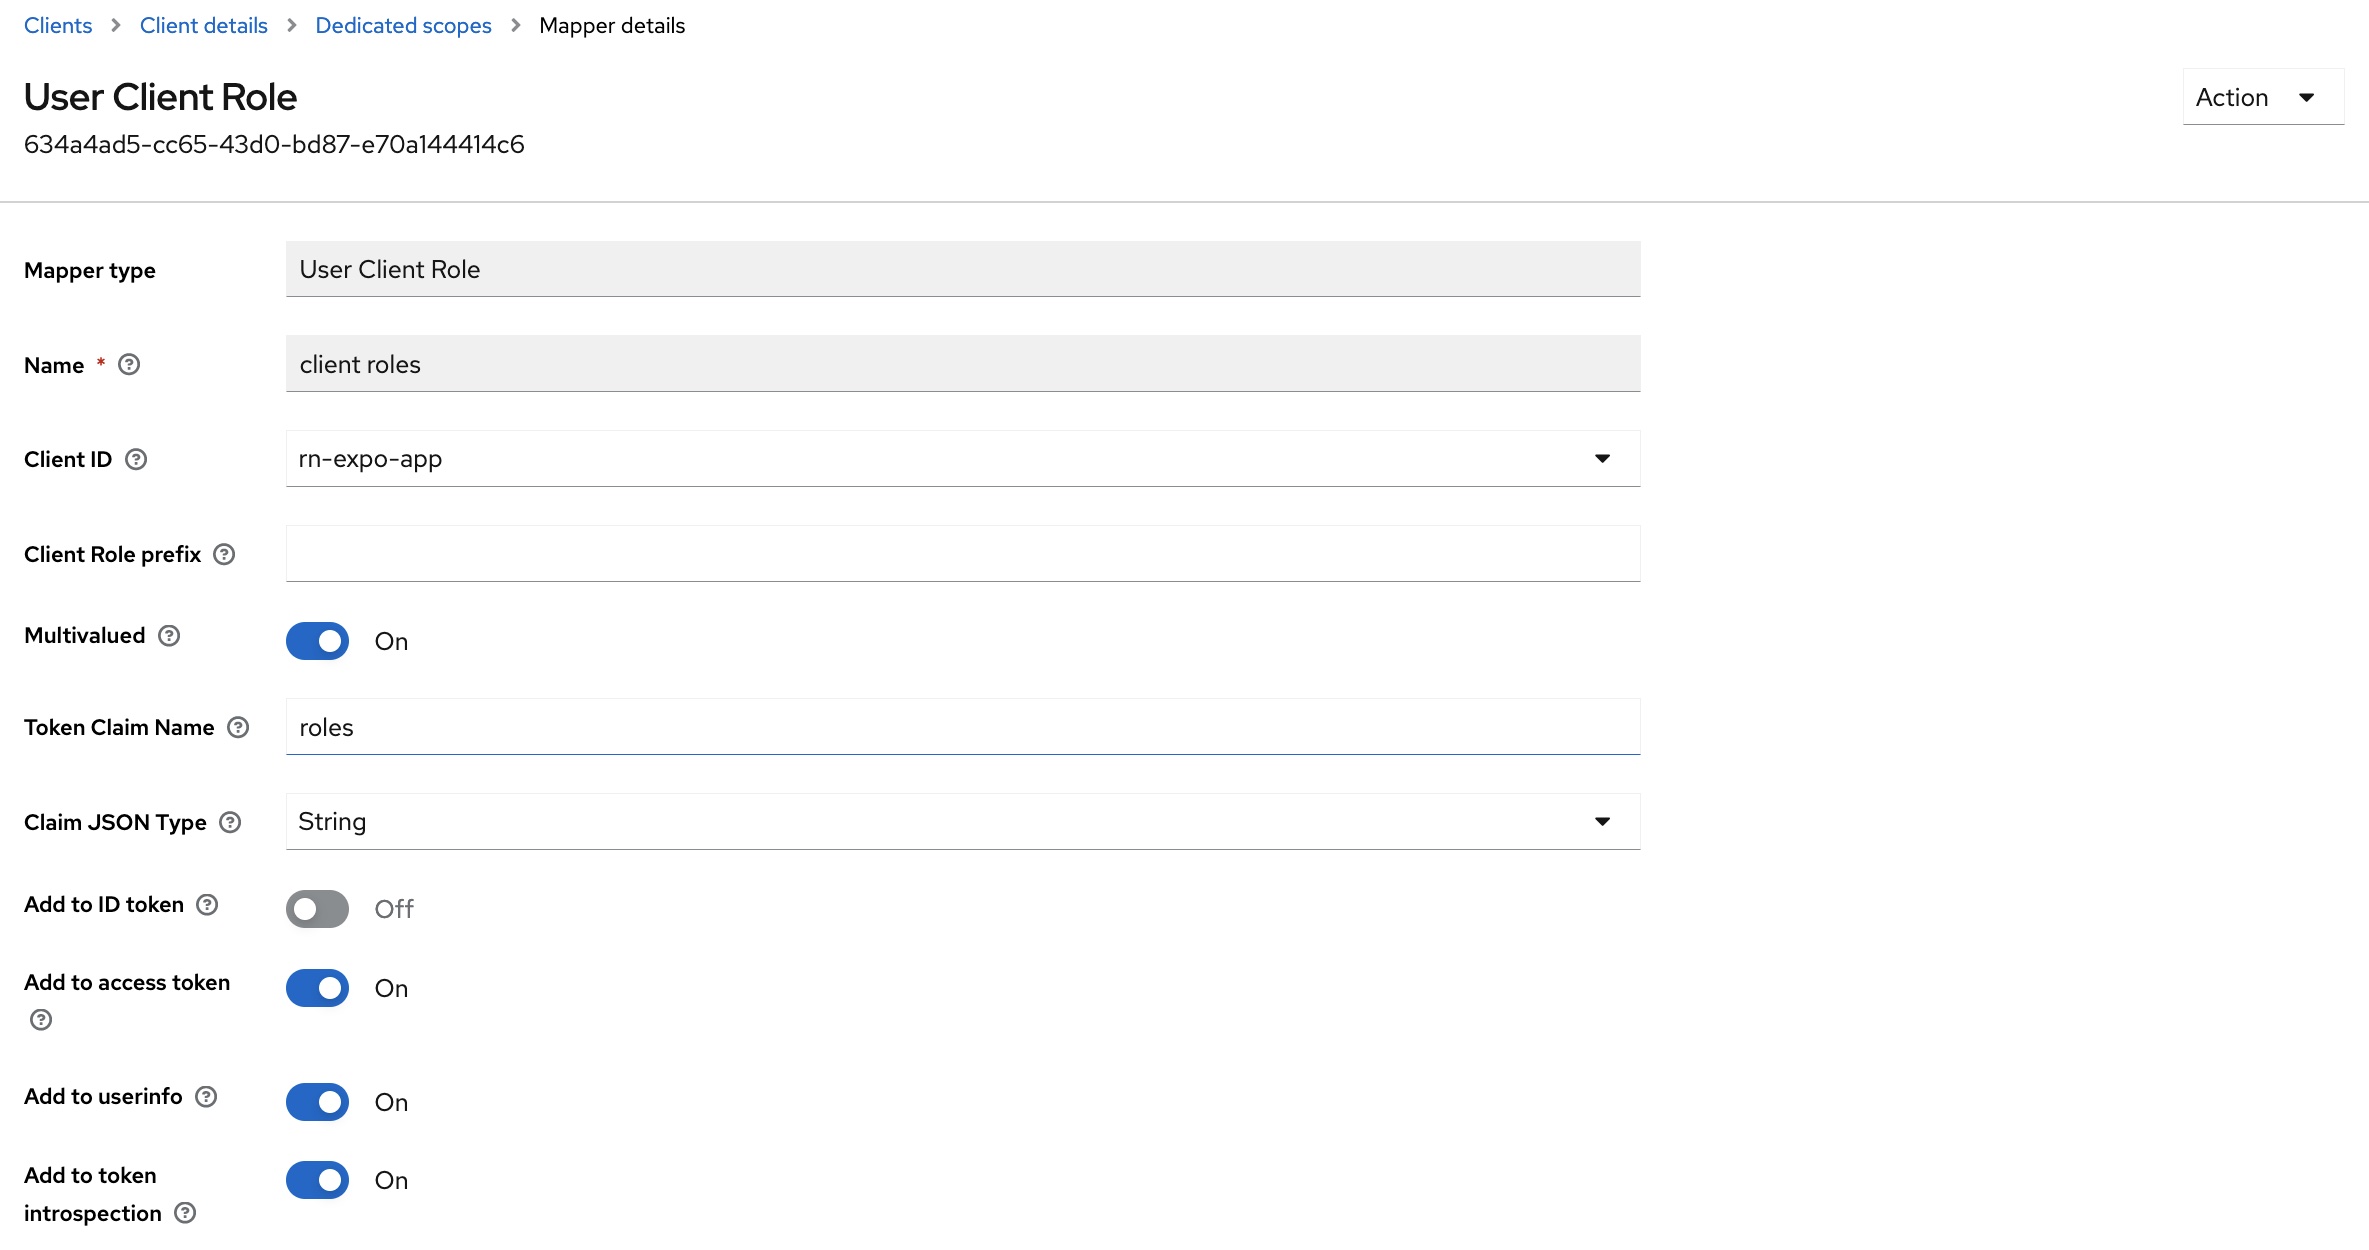
The mapper must then be adjusted:
- The value
rn-expo-appshould be selected in theClient IDfield. This ensures that only the two rolesManagerorICare taken into account. - In the
Token Claim Namefield, the value can be shortened toroles. This simplifies further processing in the app. - The
Add to userinfooption must be activated. This means that the claimrolesis included in the response from the user info endpoint and can be used in the app.
Finally, the user John Doe is assigned the role IC. Jane Roe is assigned the role Manager.
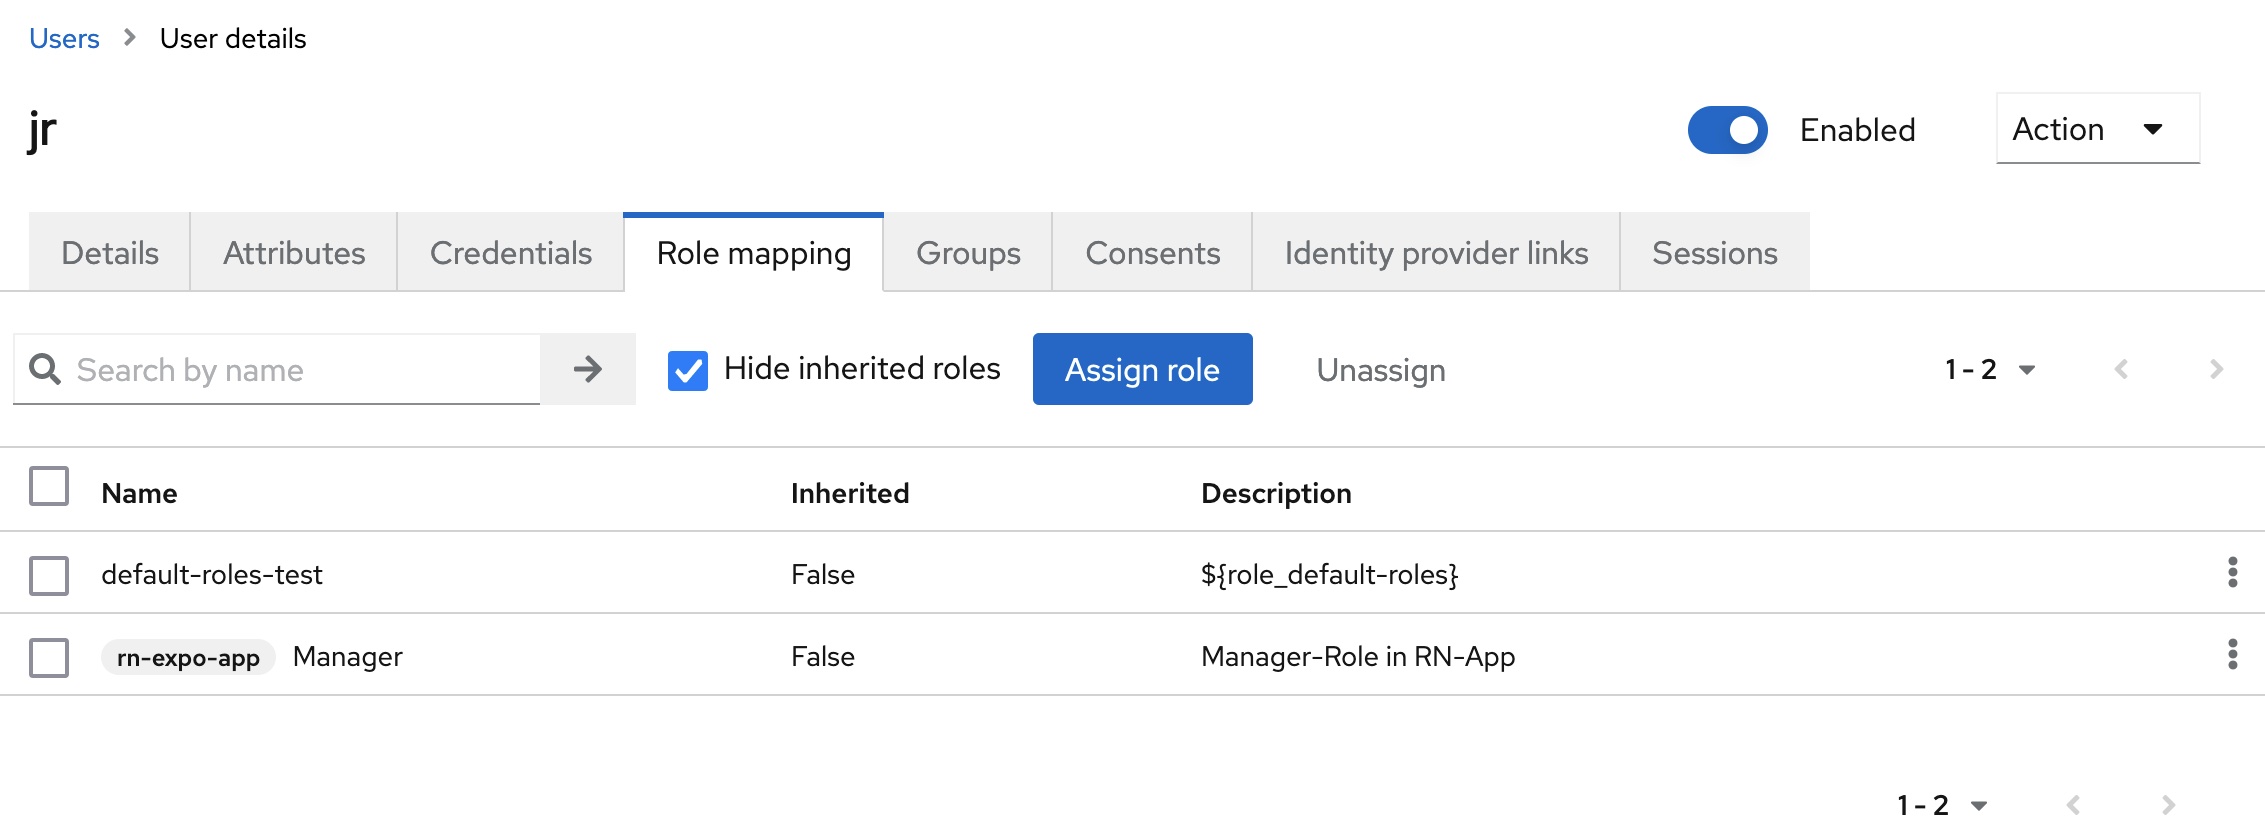
This configuration adjustment means that the assigned role is contained in the roles claim of the access token and in the user info endpoint:
{
  ...
  "roles": [
    "IC"
  ],
  "name": "John Doe",
  "preferred_username": "jd",
  "given_name": "John",
  "family_name": "Doe",
  "email": "john.doe@example.com"
}
App extension
The example app gets two additional screens ICScreen and ManagerScreen, which should only be visible to authenticated users with the corresponding role. The AuthContext is extended so that the assigned roles are also saved in the local state when the user info endpoint is retrieved:
...
      case 'USER_INFO':
        return {
          ...previousState,
          userInfo: {
            username: action.payload.preferred_username,
            givenName: action.payload.given_name,
            familyName: action.payload.family_name,
            email: action.payload.email,
            roles: action.payload.roles,
          },
        }
...
In addition, the AuthContext implements the hasRole function:
...
const AuthContext = createContext({
  state: initialState,
  signIn: () => {},
  signOut: () => {},
  hasRole: (role) => false,
})
...
The function checks whether a passed role is part of the roles assigned to the authenticated user in Keycloak:
...
  const authContext = useMemo(
    () => ({
      state: authState,
      signIn: () => {
        promptAsync()
      },
      signOut: async () => {
        try {
          const idToken = authState.idToken
          await fetch(
            `${process.env.EXPO_PUBLIC_KEYCLOAK_URL}/protocol/openid-connect/logout?id_token_hint=${idToken}`
          )
          dispatch({ type: 'SIGN_OUT' })
        } catch (e) {
          console.warn(e)
        }
      },
      hasRole: (role) => authState.userInfo?.roles.indexOf(role) != -1,
    }),
    [authState, promptAsync]
  )
...
The new screens and the new auxiliary function can then be integrated in the Main component:
import React, { useContext } from 'react'
import { NavigationContainer } from '@react-navigation/native'
import { createNativeStackNavigator } from '@react-navigation/native-stack'
import { AuthContext } from '../context/AuthContext'
import { HomeScreen } from '../screens/HomeScreen'
import { ProfileScreen } from '../screens/ProfileScreen'
import { SignInScreen } from '../screens/SignInScreen'
import { ManagerScreen } from '../screens/ManagerScreen'
import { ICScreen } from '../screens/ICScreen'

const NativeStack = createNativeStackNavigator()

const Main = () => {
  const { hasRole, state } = useContext(AuthContext)

  return (
    <NavigationContainer>
      <NativeStack.Navigator>
        {state.isSignedIn ? (
          <>
            <NativeStack.Screen name={'Home'} component={HomeScreen} />
            {hasRole('Manager') && (
              <NativeStack.Screen name={'Manager'} component={ManagerScreen} />
            )}
            {hasRole('IC') && (
              <NativeStack.Screen name={'IC'} component={ICScreen} />
            )}
            <NativeStack.Screen name={'Profile'} component={ProfileScreen} />
          </>
        ) : (
          <NativeStack.Screen
            name={'SignIn'}
            component={SignInScreen}
            options={{ animationTypeForReplace: 'pop' }}
          />
        )}
      </NativeStack.Navigator>
    </NavigationContainer>
  )
}

export { Main }
If the sample app is now started via npx expo start, the implemented authentication and role-based authorization can be tested.
Summary
Secure authentication without passwords or secrets within the source code of an app can be achieved using the Authorization Code Flow with Proof Key for Code Exchange (PKCE). An authorization server such as Keycloak supports PKCE and can be set up quickly. If the app is created based on React Native and Expo, the expo-auth-session module can take a lot of work off your hands. The remaining functions can be implemented quickly thanks to the React concepts and can also be used across platforms thanks to React Native. The extension to role-based authorization can also be achieved quickly in both Keycloak and the app.
The source code for the example is available at GitHub.